Archives for April 22, 2019

Tiger Vs. Moe and the Single Plane Swing

By:  Chandler Rusk, GGA Master Instructor

Congrats Tiger on your Masters win this past week!

So, how about a little Tiger vs. Moe for this week’s instruction. 

*******************

Before we get started, it is good to know that if you are looking to simplify the golf swing the following must occur:

You must –

  1. Reduce lateral movement for consistency.
  2. Reduce rotational movement and still produce speed.
  3. Reduce stress on the body parts throughout the motion.

Let’s take a look at the address position to get started….

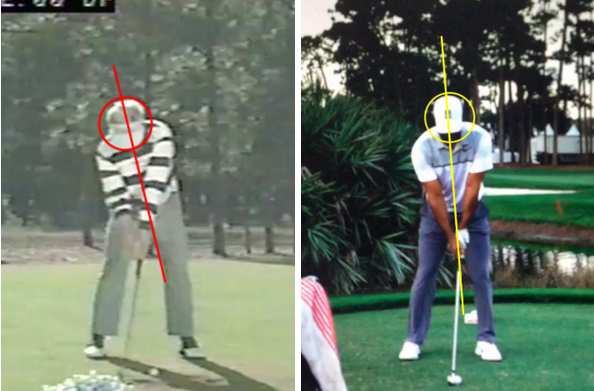
Moe and Tiger’s address position (Down-the-Line view)

No matter who we teach, we will always start with the grip & address. Simply because this is where we can eliminate the majority of the unnecessary movement.

A couple key differences here are:

  1. Tiger begins very close to the golf ball as Moe has more space. Notice the circles in between the hands and upper legs. This is a spatial problem for Tiger and is the root cause of all of his injuries.
  2. Tiger starts with his arms hanging down with the hands positioned well below where he will make the impact, this is also known as a two-plane swing. Moe starts with the club shaft on the same plane that he will make the impact – known as The Single Plane.

Face-On Address Position Above

All good ball strikers will have 25 degrees of side bend at address. Side bend is the tilt of the spine away from the target at address.

As you can see above, Tiger begins in a very straight up-and-down position (roughly 4 degrees of side bend).

Moe always began with between 15-20 degrees of side bend at address. This allowed him to maintain his head position in the backswing (see below).

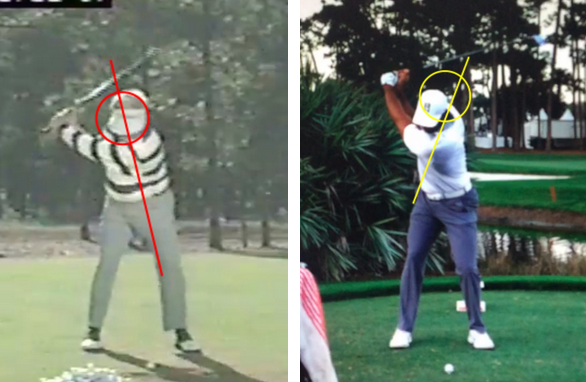
Top of the Backswing Position (Face-On View)

The address position and backswing rotations are paramount in developing consistency in the golf swing. It allows the body to transition properly to the initial part of the downswing.

Key things to observe in the above images:

  1. Head Movement

Since Tiger only has about 4 degrees of side bend at address, he is forced to create more in the backswing. This is a built-in compensation to his swing and what you will see with most conventional golfers. The head is forced down and back in the backswing. You can see that Moe’s head has stayed in position.

  1. Torso Rotation

When the head position moves down and back, the torso is forced to over-rotate. Tiger’s torso rotation is past 90 degrees at the top of his backswing which causes his arms to get trapped behind him in the downswing.

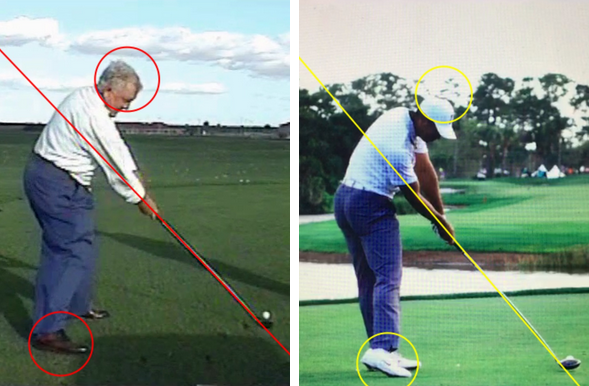
Impact Positions Above (Face-On View)

The 2nd most important way we could help Tiger, other than his address position, is how he gets to impact.

Since Tiger begins very close to the golf ball, his lower body is forced to lift and rotate to clear for his arms and hands. He snaps his left leg straight which puts immense stress on the lower part of the leg and also the lower back. All while his head has gone down and back.

When the lower body is going up but the upper body is going down, this is called compression and shear of the spine.

Remember that Moe develops space away from the golf ball at address. Since there is space, Moe was able to rotate his hips down and forward into a flexed lead knee. When the lead knee is flexed at impact, it takes all of the stress off the lower part of the leg and the back.

Side Note – In our opinion – the #1 Training Tool to help you with proper lead knee flex is the Load-n-Fire Lead Knee Brace. You can see the video about this training tool at: CLICK HERE


Impact Positions from Down-the-Line

At impact, Tiger and Moe have returned the club to where it extends through the middle of the back. This is where 99% of golfers make the impact.

Why wouldn’t everyone start there?

With Tiger, since the left leg has snapped straight, the trail heal has no other choice but to come off the ground. This is another indication that the lower body is lifting instead of staying in posture.

To see more about the Load-n-Fire Training Aid (Again – we believe one of the BEST training aids to help with lead knee flex): CLICK HERE

To see 10 Training Videos helping with trail and lead knee flex:  CLICK HERE

(Click on Load-n-Fire Drills and Tips)

************

Review of Tiger Vs Moe

  1. By simplifying Tiger’s address position, we could eliminate many compensations and also help reduce the stress on his body.
  2. Less rotation in his backswing would allow for his arms and hands to be in better position for the downswing. Tiger always fights blocked shots and snap hooks and the majority of that comes from the over-rotation in his backswing which leads to under-rotation at impact.
  3. With space created at address, Tiger could train to have a flexed lead knee at impact which would reduce all of the stress on his body and lead to more efficiency.

In Season Practice

For most – it’s golf season time or getting really close to golf season.

With the warm weather starting and sun setting later and later – hopefully everyone is getting more playing time and practice time.

So – I thought I ‘d write a little about in season practice. For those that have studied our instructions, it is what we call Practice Type A.

There are basically two different types of practice:

Practice Type A – practicing like you are about to play or practicing for playing.

&

Practice Type B – practicing to build your game, creating new habits in your swing, short game, etc. Working on changing your swing.

Practice Type A is the type of practice you need to be working on when you are “in season” or playing important rounds of golf. For the professionals, practice type A is the type of practice they perform in season, practice type B is the type of practice they perform in the off season.

Here is a good schedule and suggestions for your Practice Type A sessions.

I will use an “hour” practice session (can also break down in percentages if are practicing for less than an hour).

15 minutes (25%) Practice Putting. Start with this so you don’t skip and great way to “stretch” a little before you get on the range.

Lag Putt (30 – 40 footers – lag to a few feet (as close as possible – work on speed).

Work on making 3 and 4 footers, using 1 or 2 golf balls (no more than 2 balls), lining up the putt, setting the T on the ball toward the break and putting as if you had one putt on the course. Mimic being on the golf course. Work on your pre-shot, set up and rhythm. Work on getting comfortable over the putt.

Work on different breaks (pick one hole with break and work around it like a clock).

Work on 10 to 15 foot putts – trying to make, if miss keeping with 2 feet past the hole.

Don’t forget to hit a few putts off the edge of the green (from the fringe).

10 minutes (about 20%) Practice Chipping and Pitching

Chip and Pitch (if possible) with the same golf balls you play with. (Work on the feel, spin, the way the ball reacts when hitting the green and out of the rough).

Chip with 2 golf balls – hitting different shots to different holes. Don’t get stuck on one hole. Work around to get different chips.

Pitch the same if possible. If not, do a few minutes on the range before you work on full swing. Work on pitch shots that will roll out a little and some flop type shots with as minimal roll as possible.

5 minutes (about 5%) Practice Sand / Bunker

Work on first getting the ball out of the bunker (being aggressive enough).

Next, work on getting on green.

Finally, work on getting close to the hole (spin control).

This is not the time to “create” your bunker game – this is the time to get the feel for the sand and “remind” yourself how aggressive you need to be out of the bunker.

If you do not have a bunker for practice – use this time for additional chipping and pitching practice.

15 minutes (about 25%) Practice All Clubs in Your Bag Except Your Driver

Start with the wedge(s) and work through the irons to the longer clubs (hybrids, fairway woods, etc.)

Use an alignment aid to check alignment (whether in a Practice A or Practice B setting always use an alignment aid).

Do not get “stuck” on one club. Work through all clubs working on tempo and alignment.

Work on different shots (low, high, etc..) as you would have on the golf course (into the wind, downwind, cross wind.)

Hit a targets, check distances (to the best of your abilities hitting range balls).

15 minutes (about 25%) Practice with Your Driver

Use an alignment aid to check alignment.

Work on different shots (high, low, etc.)

If you hit a lot of fairway woods / hybrids off the tee – give them some time during this session.

Do not “shot gun” this practice. Pick a target, tee up a golf ball, check alignment, and hit. Do again as if you were on the golf course.

Work on tempo, check alignment (and ball position).

Work on different tee heights and ball positions for different shots (high vs. low) – down wind us into wind.

*******

As you see, this type of practice (Practice A) is not the practice to build or change your swing. This type of practice is again the practice to get ready to play or to keep your game in “playing mode”.

If you are one that wants to perform Practice Type B and Practice Type A in season, you must give yourself enough time for the Practice B sessions to take effect (typically about 3 weeks of continual practice to create a new habit) and also give yourself enough Practice A time to get ready / comfortable for those upcoming rounds.

It is difficult to mix Practice Type A and Practice Type B in the season. We recommend if possible – perform Practice A in those months you are playing a lot of “important” rounds and Practice Type B when those rounds don’t “matter as much….” or even better – those months when you aren’t playing.

LEARN

THE

SWING

Join 1M+ Subscribers to get your FREE Video Quick Start Guide that reveals how to hit the ball farther and straighter more consistently from now on…

START YOUR NEW GOLF SWING