Your Steps to Single Plane Success

Your Steps to Single Plane Success

By Tim Graves, PGA

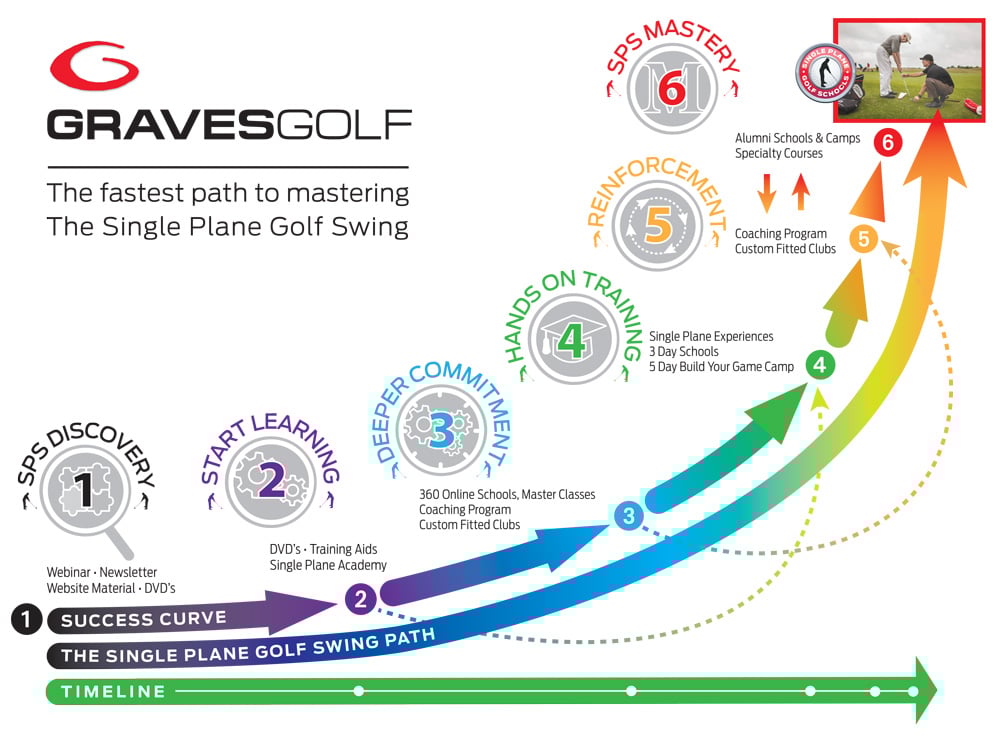
A few years ago we introduced the Graves Golf Academy (GGA) “Path to Single Plane Success.” We call this simply the “Path”.

Over the years we have helped thousands of golfers improve their games. The GGA “Path” is the GGA formula for success– the most effective way that we can help you become a better golfer.

By identifying where you are on the path, we can help you improve more rapidly and have more fun. The Path is the greatest experience GGA can provide for you – the aspiring Single Plane Golfer.

Why Does The Path Offer the Greatest Chance of Success?

GGA’s mission is to simplify the complexity of golf. We do this in the following ways:

  • An easier way to swing – The Single Plane Swing
  • A short game methodology that relates to the golf swing
  • Providing DVDs, Programs and training tools to help the student’s self-progress
  • Online schools and coaching for faster improvement
  • Golf schools and hands-on Instruction helping match “feel and real”
  • A system to take learning to the course – for lower scores

The GGA Path is an all-inclusive “System” to improvement

How Long Does It Take?

No matter where you are with your golf game, the “Path” IS the shortcut to your improvement. Based on years and years of experience studying tens of thousands of students, we have identified exactly how students improve. All of them have followed the GGA Path. Think of the Path as though you were building a house. What would you do first? Most people say, “Build the foundation.” But the most important thing is the “Plan,” the “Design,” the “Blueprint.” The GGA Path is the Plan. Once you have the plan in place you can take the next steps – build the foundation and move yourself along your personal Path.

Why Does The Path Matter?

The Path comprises the exact steps you need to follow to build a fundamentally solid Single Plane golf game. The Path matters because we know what it takes to have success. We have built the plan. All you have to do is follow the GGA Plan – stay on The Path.

What Is The Best Way To Start?

Contact a GGA Coach. The best way to start is to determine exactly where you are and where you need to be on the path. The GGA Coaches can help you assess where you are now and help you get to the next level. Just contact me at timg@gravesgolf.com. I will get you in contact with one of my coaches and they will help you determine where you are on the path, what you should do next, how to speed up improvement and how to guarantee success EVERY time you practice. Again, just email me at timg@gravesgolf.com and I will get you started. It costs NOTHING to talk to us…

What is the most important part of the path? 

Each part of the path is a unique building block of understanding, training and coaching. The most important part of the path is knowing where you are and how to move to the next level.

Where Am I On The Path?

The GGA coaches will help you determine where you are. For example, are you fully familiar with the Single Plane Swing, and the Moe Norman Model? This would place you at step 1. If you are not, have questions, need direction, want more information, want a way to guarantee success – CONTACT us now..!

Are you practicing correctly with feedback tools? Are you using our material, information, tools, etc.. when you practice and have you identified your weaknesses? This would place you at step 2. Do you need All our training tools – absolutely not… you need information / tools, etc.. that work on your weaknesses…. Long game? Short game? Mental game? On Course? Let us help you figure out where you need to start…

Have you worked through the SP30 or any of our online programs? Do you understand the TOTAL GGA System of how the long game relates to the short game and vice versa? This would put you at step 3. If you have not or don’t know what we are talking about – email me – I will point you in the right direction.

The GGA Path is like building a house, starting with the Planning and Understanding Stage – the building of a foundation of understanding. Constructing the foundation is next. Then, as you progress, you begin to construct framing and walls, add wiring for electricity, plumbing for sanitation and water supply, and other required systems. As you add exterior details, your house takes shape. Along the way, you might have your work inspected (inspectors / “coaches”) to make sure you are building everything correctly according to code. Then once everything is built, you fine-tune the details of the paint and trim with the feedback of proper coaching.

Lets look at each step to help you identify where you are in building your Single Plane Golf Swing.

Step 1: Discovery / Single Plane Swing Introduction

At this step, your curiosity, frustration (and maybe pain) has led you to look at the Single Plane Swing as an answer to your problem. You haven’t fully committed at this stage, but you wonder if the Single Plane Swing might be the answer to your golf game’s health.

Step 2: Begin Learning the Fundamentals

At Step 2 you have an understanding of the basics for the Single Plane Swing and the short game. You might not be able to swing like Moe yet, but you understand the basics of the Moe Norman model. At this stage you start to teach yourself the Moe Norman swing by watching the videos.

As you attempt to learn the swing, we suggest that you dive deep into the training with the proper drills and practice techniques. The Graves Golf Academy has specific training DVDs, programs and training products that help you understand the model and practice the ideal way. The most important and most comprehensive training portal is our Single Plane On Demand App. It has over 2,000 hours of instruction, information, search engine, EVERYTHING we have produced at Graves Golf. You can see at: https://watch.gravesgolf.com/browse

Graves Golf training aids help you ensure that you are practicing correctly by giving you feedback in every practice session. Step 2 is all about self-practice and making sure you are practicing correctly. This is where you start building the foundation of the house. Do you have the tools the work specifically for you and your needs / weaknesses / check points, etc..? Can you guarantee you are practicing perfect every time you practice (any time of year) and can you guarantee you are practicing correctly EVERY TIME?

Contact me at timg@gravesgolf.com and I will help you NOW!!

Step 3: Deeper Commitment

Step 3 takes in what we call the “breakthrough” zone. This is where students apply the fundamentals they have learned and their practice starts to pay off. This deeper commitment means a deeper understanding as you move into the next stage of building your game. Graves Golf Online programs, Master Class. This even includes working with a Coach in the Video Coaching program. At this stage you are building the walls and putting on the roof and the structure is taking shape.

Step 4: Hands-on Training – (Progress accelerates)

Step 4 is all about attending a Graves Golf School(s) and working with the Coaches. At this stage Graves Golf Coaches can show you “in person” the exact things that you need to do improve. This is where what you have been feeling as you practice on your own meets reality. This is where we can personally customize and tailor the program for your improvement. Progress accelerates at this stage dramatically!!  This is where you install the wiring and plumbing and drains and put up the exterior walls of the house. Everything starts to come together.

Step 5: Reinforcement

At stage 5 you have everything you need to know to build a great golf game. Now you need coaching and custom-fitted clubs to practice correctly and put in the dedicated time to improve. This is where the Graves Golf Coaches can help you stay on track and stay accountable. Graves Golf also recommends that at Step 5, if you haven’t done so already, that you take a serious look at your golf equipment to ensure that you are getting the most out of your game. At this stage you are painting your house, getting it inspected and making sure all of the plumbing, electrical and fixtures are up to code.

Step 6: Single Plane Mastery

At stage 6, you are on your way to Single Plane mastery by attending Alumni Schools, Camps and Specialty Courses. Your house is built. Now you need to furnish and decorate. But this doesn’t mean the work is done. Anyone who owns a house knows that you can always adjust and improve and make sure that everything is working correctly. This is where the Graves Golf alumni and coaching programs can keep you comfortable with your new game (in your new home).

How do I measure my progress on the path?

Once again, think of your golf game as you would if you were building a house.

Do you have a plan?

How is your foundation, including your grip and setup?

How are your short-game fundamentals?

Do you know how to practice or have the tools needed to make progress?

If the fundamentals are in place, do you KNOW that you are correct?

Do you need help from a coach?

We can help you determine where you are on the Path and help you Build a Success Plan.

Email me at timg@gravesgolf.com and I will direct you to the appropriate coach(s).

Talk soon!!

Tips For Improving (Part 1) – Natural Instincts is Baloney…

By Tim Graves, PGA

A few years ago now – I wrote a series of instructional articles inspired by Dan Coyle’s “The Little Book of Talent, 52 Tips for Improving Your Skills”.

At the time – these articles got GREAT REVIEWS!!

This past week, we held one of our Alert Attitude of Indifference Schools (Mental Game Schools).. and guess what – we talked about Dan Coyle’s Book again (and again and again…).

So, I figured it is about time to bring these instructional articles back – whether reading for the first time, or seeing again – GREAT winter training information.

*******

The more I teach, the more I realize it is more about getting adults to make changes vs. teaching fundamentals.

To be honest, the fundamentals of Moe’s single plane swing really aren’t that difficult (if you compare to many other methods)… the difficult part is getting adults/students to make changes.

As we have discussed many times, it is not about breaking habits (that is impossible), but rather about creating new habits.

Over the past years, we have worked and worked and worked with 1,000s of students and we have worked and worked and worked on what is the best way for adults to create new habits.

A couple of years ago, we came across a book called “The Talent Code” by Daniel Coyle. If you have been reading our past newsletters or watched our webinars in the past, I am sure you have heard us reference this book many times. In fact, we had Mr. Coyle as a guest lecturer and instructor during one of our past webinars. The Talent Code is about how to create new habits through deep practice – everyone knowing that practice is a key to success. What everyone doesn’t know is that specific kinds of practice can increase skill up to 10 times faster than conventional practice. It also discusses ignition – motivation to get started and master coaching – virtues that enable coaches to fuel passion, inspire deep practice and bring out the best in their students. A great read I would recommend to everyone.

A couple of years ago, Mr. Coyle published a new book inspired by the original Talent Code called “The Little Book of Talent, 52 Tips for Improving Your Skills”.

It is described as a manual for building a faster brain and a better you. It is an easy-to-use hand book of scientifically proven, field tested methods to improve your skills – your skills, your kids’ skills, your organization’s skills – in sports, music, art, math and business. The product of five years of reporting from the world’s greatest talent hotbeds and interviews with successful master coaches, it distills the daunting complexity of skill development into 52 clear, concise directives. Whether you are 10 or 100, this is an essential guide for anyone who ever asked, “How do I get better?”

9780345530257

(The book is available at Amazon.com)

What I want to do in upcoming instructional e-tips is go through these tips for improving your skills and directly relate them to you creating new habits and learning the single plane swing fundamentals.

Tip # 1   Stare At Who You Want to Become

Use this as an “energy source” for your brain. Use pictures or, better, videos. Watch videos of who you want to emulate (Moe), watch them before you practice, watch them at night before you go to bed, watch them anytime to imprint a vision of what you want to do.

A great place to see videos of Moe is on our Single Plane Academy ON DEMAND APP. You can get more information at: https://watch.gravesgolf.com/browse

Go to the home page and and you will see Moe vs. Pros Section.  You will also see exclusive content which includes numerous hours of Moe’s Clinics.  You will see videos and still pictures of Moe performing demos, etc.

Tip # 2  Spend Fifteen Minutes A Day Engraving The Skill On Your Brain

Watch the skill being performed, closely and with great intensity, over and over, until you build a “high-definition” mental blueprint or “engrave” in on your brain. The key to effective engraving is to create an intense connection: to watch and listen so closely that you can imagine the feeling of performing the skill. Project yourself inside the performer’s body… Become aware of the movement, the rhythm; try to “feel” the interior shape of the moves.

Again, would suggest watching the Moe videos.  As Mr. Coyle stated, spend 15 minutes doing this – this about all the time we can focus intently on something. too much we lose focus and will “wonder” back into our old habits… Picture yourself swinging like Moe, think what it would and should feel like, watch his timing and rhythm….

Tip #3 Steal Without Apology

We are often told that talented people acquire their skill by following their “natural instincts”. This sounds nice, but in fact it is baloney. All improvement is about absorbing and applying new information, and the best source of information is top performers. So steal it.

We have done this for you.  Obviously we are “stealing” Moe’s swing. We have done the research for you, we have the “stealing” for you.  Study the information and use the search engine on our “Single Plane On Demand” App / Site. Use the search engine to search for particular areas / things you have questions on.  It is the absolute best place to start learning Moe’s fundamentals.

Tip #4   Buy A Notebook

Top performers keep some form of daily performance journal. What matters is not the precise form. What matters is that you write stuff down and reflect on it.  Results from today, ideas for tomorrow, goals for next week, etc. A notebook works like a map: It creates clarity.

Again, these are tips from The Little Book of Talent – 52 Tips for Improving Your Skills.

This is just a start – we will be reviewing many more tips for improvement and relate them to how you can create new habits / learn Moe’s single plane swing.

Following these tips are designed to help you get started, improve your skills / swing, and then help you sustain progress.

Tips For Improving In The Off Season

By: Tim Graves, PGA

Thought it was about time to start talking about off season / fall / winter practice. I know for most of us it is time we are inside, and when inside, some of us try to figure out ways to practice to get ready for the spring.

Before we get into any details – wanted to review a little about practice (especially when working on new habits over the off season).

It is essentially impossible to break bad habits (our mind/body is not set up that way) … but we are set up to be able to create new habits and ultimately make changes/create new movements, etc.  we want.

Sustaining Progress

Developing your skills (and talent) is like taking a cross-country hike. You will encounter challenges, you will hit snags, plateaus and steep paths; motivation will ebb and flow. To sustain progress, it’s necessary to be FLEXIBLE one moment and STUBBORN the next, to deal with immediate obstacles while staying focused on the horizon (or your ultimate goals).

Don’t Waste Time Trying to Break Bad Habits – Instead Build New Ones

I bet I talk about this so many times in our schools, many of our students probably get “sick” of hearing it.

When it comes to dealing with bad habits, many of us attack the problem head-on, by trying to break the habit. This tactic, of course, doesn’t work. And we are left with the old truth – habits are tough (if not impossible) to break.  The blame lies with our brains.  While we are really good at building circuits (creating habits), we are awful at quitting them. Trying as you might to break a bad habit, it is still there, waiting patiently for a chance to be used.

So, what do we do?

The solution is to ignore the bad habit and put your energy toward building a new habit that will override the old/bad habit.

To build new habits, start slowly. Expect to feel stupid, clumsy, uncomfortable, and even frustrated at first…. after all, the new “wires” in your brain haven’t been built yet. Your brain still wants to follow the old “comfortable” pattern. Build the new habit by gradually increasing the difficulty, little by little. It takes time, but it’s the ONLY way new habits are created and grow.

To Learn It More Deeply, Teach It

Here is the issue. Every good golfer, every golfer who learns something new/reaches a goal, etc… must be their own best teacher. If you cannot teach yourself, your ability to make changes, create new habits, reach goals, etc… will occur in a much slower rate.

This is not saying you must create everything yourself, but it is saying you must take what you learn and translate into self-teaching.

Think about it – how much time to you spend practicing, and how much of that practice time is with someone teaching you?

If you are like most, 90% + of your practice time is on your own, trying to create new habits, etc… on your own. Meaning, you must be able to make sure you are doing things correct, must be able to make sure you are “going down the correct path”.

A great way to determine if you can teach yourself it ask yourself “Could I teach this (new habit I am trying to learn) to someone else?”

This works because when you communicate a skill to someone, you come to understand it more deeply yourself. Also, when you see someone struggle, and help them through it, you improve your ability to deal with your own struggles.

The saying “Those who can’t do, teach” should be rewritten as “Doers who teach do better!”

Give a New Skill a Minimum of Eight Weeks

When it comes to growing/creating/developing new skills, eight weeks seems to be an important threshold. It’s the length of many top-level training programs around the world, from the Navy SEAL’s physical – conditioning program to the mission training for the Mercury astronauts. A recent study at Massachusetts General Hospital showed the practicing meditation for twenty-seven minutes a day created lasting brain changes in (you guessed it) eight weeks.

Of course, this doesn’t mean that you can be proficient in any skill in eight weeks. Rather, it underlines two more basic points:

1)  Constructing and honing new habits takes time, no matter who you are, and

2) Resilience and grit are vital tools, particularly in the early stages of learning. Don’t make judgements too early.

Keep at it, even if you don’t feel immediate improvement. Give your talent (your brain) the time it needs to grow and create new habits.

Watch upcoming newsletters for more off season practice tips and watch for our soon to be released FAST FORWARD WINTER TRAINING PROGRAM.

Top 5 Club Fittings Mistakes Found in Golfer’s Bags

By Tim Graves, PGA

As most of you know (by now..), your clubs must fit the swing you are working toward.  If they do not fit you, it is very difficult to make swing changes and / or those swing changes will be slowed dramatically.   I like to call it “taking the excuses out of the bag”.

But, before I start going through each club in the bag (future articles), I wanted to start with the “Top 5 Club Fitting Mistakes” you see in many golfers bags.

 1.  Driver

The first most common custom club fitting mistake with the driver is not enough loft for the driver for a golfer’s fit.  The optimal loft of a driver for a golfer will give that golfer maximum fly and maximum roll for their swing speed.

Examples:

Hit a 6 iron 150 to 160 yards:  Driver should have 10.5* loft

Hit a 6 iron 120 to 130 yards:  Driver should have 12* loft

2nd most common mistake with drivers is shafts that are too heavy for the golfer.  Golfers want more distance and forgiveness with their driver.  With the appropriate loft, a lighter shaft will help many golfers get more distance with their driver.

40 to 50 grams is considered a “Light weight” shaft and 50 to 55 grams is considered a “mid weight” shaft.  Many golfers have 60 gram or heavier shafts in their drivers and need lighter weight shafts (especially those with senior and regular flex) and wanting more distance with the tee ball.

2.  Fairway Woods

The most common mistake with fairway woods is golfers do not have enough loft (for maximum distance off the ground) with their longest fairway wood.

In other words, most golfers SHOULD NOT carry a 3 wood (unless they use this 3 wood primarily off a tee).

To hit a 3 wood (15 to 16* loft) appropriately (maximum fly and roll) you need to be able to hit you 6 iron at least 175 yards on the fly…

Most will hit a 5 wood (or 7 wood) further than their 3 wood off the ground.  They need the loft of the 5 wood (18 / 19*) for maximum fly and roll.

(FYI – even most professional golfers will hit a 17* / 18* fairway wood off the ground as their longest fairway wood… then why do so many average golfers hit a 15* fairway wood off the ground and get “poor” results..)

3.  Hybrids

The most common mistake is golfers DO NOT have their hybrids fit / customized for their individual lie angle.  Golfers MUST have the lie angle adjusted / fit for their size and swing.  For most, lie angles of their hybrids are too upright, and golfers “heel dig” their hybrids and either top, pull or hit poor shots with them.  This is why so many golfer can hit their hybrids “okay” out of the rough, but have difficulty hitting them off of fairways or “tight” lies.

Hybrids MUST be fit for the lie angle for an individual golfer.  If not, the hybrid is working AGAINST the golfer.

Very few golf equipment companies fit / adjust lie angles for an individual’s size (Callaway is one, that is why their customization process is rated so high).

4.  Irons

Honestly, there are many common mistakes when it comes to golfers irons (length, lie angle, flex, etc..) but for this article – will focus on one…

The most common mistake with irons is golfers do not have correct shafting in their irons.

Correct shafting in irons (and all clubs) allows for the correct height and flight of the golf ball for the golfer.  Having the correct / appropriate height gives the maximum and optimal distance for irons for that golfer.

And correct shafting “protects” golfers.  For a majority of golfers (over 40 years of age… younger for some) – they need a shaft that does not damage or protects the body.  Graphite shafting in irons protects the body.

Graphite shafting for golfers has the following characteristics:

  1.  Much easier on body – will protect elbows, shoulders, wrists, back, etc..
  2.  Will be more forgiving on golf shots (thin and heavy shots will go further, react better with graphite).
  3.  Are more consistent – especially over time.  Graphite is by far the most consistent material in shafts compared to steel.
  4.  Will allow for increased distance as graphite shafts in irons can be lighter and kick the ball up higher than steel.

5.  Wedges

The most common mistake with wedges in most golfer’s bags is wedges not being fit at all…

For most golfers, when talking about the Gap, Sand and / or Lob wedge, they think they can purchase these clubs “off the shelf” in their local club shop and they are good to go….  that can not be further from the truth.

Wedges must be fit to an individual for length, lie angle, shaft flex (and weight), grip size, lofts, etc..

Think about it… you are hitting a chip or pitch (1/2 shot or less) with your wedge and you “heel or toe dig” the wedge because it isn’t fit properly.  That club is going to twist in your hands… you will push, pull, chuck, or even shank the shot.. not because of poor technique, but because of an improperly fit wedge.

It always amazes me how many golfers I watch “chunk” chip / pitch shots (in my pro-ams) with improperly fit wedges for them and they get so upset…. without realizing they really have very little chance of hitting those short game shots well with improperly fit wedges…

Again – as I like to say… “You must take ALL excuses out of the bag”

If you have any questions about your fittings / individual fit, please feel free to email direct at timg@gravesgolf.com

If you would like a free individualized custom fit for you – please see:  CLICK HERE

Five On Course Instructional Tips

BY TIM GRAVES, PGA (Co-owner Graves Golf Academy)

These are things I see most “amateurs” have problems with during their round and things that can be “fixed” during practice.

1. Work On Controlling Trajectory –

This is a big one… One BIG difference between low handicap/professional golfers and average golfers is the ability to control trajectory. Whether hitting shots into the wind, or down wind, hitting shots to pins in the front of the green or back of green, all good golfers have the ability to control trajectory of their golf shots.

Example 1 – You are hitting a drive into the wind (a good wind) – if you can’t keep the driver flight (trajectory) down, it will cost you significant distance AND control. You will be hitting more club than you should into the green and probably from places you don’t want to be.

Example 2 – You are hitting to a pin in the front of the green (maybe behind a bunker) or just in the front of the green where you need

to fly onto green to hit it close. You MUST be able to hit the ball a little higher than normal to hold the green – if you hit normal trajectory (or lower) – it will skip to back or over green…

There are many examples, think of the last round you played (maybe there was some wind in that round) – would it have helped to be able to control your trajectory a little better… Most average golfers would definitely see better scores if they could.

Next time you are practicing on the range – rather than just working at hitting toward a target, etc.. work on different ball flights. Work on high shots, low shots and shots in between. Work on changing ball position in your stance (back to hit lower, forward to hit higher) and making sure your hands are leading “consistently” to change ball flight/height. Work on hitting lower “solid” shots that would work into the wind, work on higher shots that would work downwind, etc..

2. Take Enough Club

Think about the last round you played. Think about your approach shots into the greens. In other words, the shots into the greens that you had a chance to get to the hole (tee shots on par 3s, hopefully 2nd shots on par 4s, etc…).

How many times did you hit an approach shot to the green/pin and you got the ball to the hole (at least hole high)? How many times did you hit the ball short… and many times up to a club or two short?

When I play in pro-ams, if I had to estimate, over 75% of the time, the amateurs I am playing with do not get the ball to the hole. And many times, they are significantly short of getting there. They are either not hitting it “solid” or they are “dreaming” of how far they can hit particular clubs. You’d be very surprised how far good players hit their irons…. Most don’t hit it near as far as you are led to believe. In fact, for most professionals, their 150 yard club is an 8 or even 7 iron…

Next time you play – take one more club (or more) when you are hitting your shot into the pin (unless the pin is in the back of the green and over the green is “bad”…). If you hit it long, then you have “permission” to “club down” next time… If you don’t, keep taking one or two more clubs until you are consistently long… Example, you are 150 yards out and normally hit a 7 iron – hit a 6 iron or even 5 iron/hybrid.

You’ll be surprised how taking an extra club or two on each shot will DRAMATICALLY help your scoring – it will “allow” you to swing easier, which will in turn help you with consistency, solidness of hit, etc… Keep taking a “little more club” until you are hitting long consistently.

3. Hybrids ARE NOT Good Clubs For Low/Under Tree, etc.. Shots

Big mistake I see during pro-ams is when an amateur gets under a tree (or needs a very low/punch type shot) and he/she pulls out a hybrid (baffler, etc..) and tries to hit the shot.

Hybrids are designed as long iron replacements and are designed to get the ball up faster and easier than the comparable long iron. As stated – to get the ball up faster…. and if you are trying to keep the ball low (maybe under tree limbs, etc..), hitting a hybrid / baffler goes against the “make up” of the club.

Couple of options (other than using hybrids/bafflers for the low, under tree, punch shot):

1. Hit a 3, 4 or 5 fairway wood (good unless you are hitting out of mid to high grass).

2. Carry a long iron if you think you might have a few of these shots during a round… Example – you are playing a course with many trees and is tight off the tee (tree lined). Maybe carry a 3 hybrid, 4 iron and 5 hybrid, etc.. If you need a 4 hybrid during the round (and carrying a 4 iron instead), choke down on the 3 hybrid a little and hit it (or choke down on a 5 fairway wood). Then you have a 4 iron to punch out of the trees..

3. If there isn’t much grass under your trees, or much rough to go through, you can punch or even “top” a driver. I have seen many good players use this shot – they need to hit under a tree(s) and there is very little grass, they “top” a driver and it rolls and rolls and rolls… great shot that rolls a long way…

4. If all else fails, take the longest iron you have in the bag (maybe a 5 iron or 6 iron), choke down on it, put back in stance and hit a hard punch/long chip type shot. Putting in back of stance and not releasing the club will help keep low.

4. Get Back to the Fairway / Check Your Line To The Pin

This is a big mistake I see made often by amateurs… They hit the ball into the rough (mid to deep rough) and take the “wrong” route toward the pin.

Next time you hit the ball into the rough (off the tee, etc.), look a little more at the line you are about to take toward the pin. Now, assume the shot will come out 50% of the distance you think… or maybe 75% of the distance you want. If it does, where will it go. In the rough again…. It is MUCH better to have the ball a few yards (maybe 50 to 100) short of the green in the fairway rather than in the rough with a difficult shot again.

It is helpful to use the middle of the green or even the “wide side” of the green as your target next time you are in the rough. Professionals/good players call it “taking their punishment” for hitting it in the rough.

First – it is very hard to stop a ball when hitting from the rough – the grass between the ball and club face will minimize spin dramatically.

Second – it is very hard to control distance from the rough for the same reason – you will probably not hit the ball first… grass between club face and ball.

Third – many times you will need enough loft on the club to get the ball out of the grass that probably won’t be enough to get to the pin (green).

So – next time you hit your shot into the rough, consider “taking your punishment” and hitting toward the middle/wide part of the green. Hitting your next shot from the “short grass” /fairway short of the green or having to 2 putt from a distance (wide side of green) is MUCH better than having to hit a shot from the rough again…

5. Chip With The Correct Club

If you know me, you’d know I’d have to throw at LEAST one short game tip in here…

First – use the short game RULE OF THUMB:

Putt When You Can
Chip When You Can’t Putt
Pitch When You Have Too…

Always use that rule above… I don’t care if you are 30 feet off the green, if the grass is short enough to putt it (and you are comfortable) – putt it. An average putt is typically better than a good chip, etc..

Now when you chip – use the correct club.

That means, you want minimal fly (enough fly to get you just on the green) and then roll the rest of the way to the hole. The more you fly the ball, the more room for error in the shot.

I see way TOO MANY amateurs using the wrong club for the chip shot. For example, they have a chip that is 50 feet from the hole, 10 feet of rough of rough to fly and 40 feet of green. It would call for an eight iron, they take a wedge (sand or lob) and chip the ball. It hits the green and stops too fast… (too much spin, wrong club, etc..). It is MUCH EASIER to take a club that will fly the ball less and roll the ball more…. and MUCH more controllable.

Hopefully these 5 tips will help you on the course and you can start practicing these to help lower your scores/improve your game.

Focus On One Thing At a Time

By Tim Graves, PGA

I wanted to tell everyone a story about a student I (Tim) have been teaching the past few months. Of course, as always, story is to help those who read it…

I have been teaching a young man from Edmond, OK for about 2 months now. His father called me and asked if I would take a look at his game and determine if I could assist him. This young man is a student at the high school down the road from our course and plays on the golf team (he’s a freshman). The tie I had with his father was I played on a Pro-Am team with him last year in a tournament I play in yearly. He remembered my game and “history” and wanted to know if I could possibly help him. I told him I’d see…

I met the young man at his golf course and played nine holes with him.

My assessment was as follows:

  1. Pretty good short game – (you guys knew I’d look at that first).
  2. Swing was inside to out with almost no release – reason was very poor balance and body positions would not allow for a good release in his positions.
  3. Because of swing he was hitting weak left shots with almost no distance (He is left handed)
  4. He was having to hit mid to long irons to all par fours – his friends his age were outdriving him by 40 yards +++.
  5. His grip was good – his set up – hands too low, head too far forward, weight center (balance) was toward the toes, and very little knee flex because of this.
  6. There were other issues… but most others were minor.

His stroke average for the year was 78.5 and best round was 75. So – I told his father we could start working together. I’d do some work with him.

Little history about the young man –

  1. He has no idea who Moe Norman is.
  2. He has no idea what a single axis swing is.
  3. On his golf team, he plays with many good players including one whose father plays on the PGA tour.

So we started.

The first thing I did with him was reviewed the fundamental positions. He had a good grip, so we went to set up. He was leaning way too far forward (toward the ball) on set up. I showed him the correct position, videoed him before and after we made the change to show difference and had him demonstrate to me. He hit about 10 balls during the hour lesson – mainly just set up and tried to get comfortable. Then set up again, and again and again and again.. hitting only a couple of shots. I asked him what it felt like, what he saw, etc.. This was the first lesson.

Lesson #2 – I saw him a week later. When I saw him, he was back to his old set up…. (not the one we had worked on). I set him up again in a proper set up (single plane of course) and went through the exact same process of the first lesson – no more.

Lesson #3 – Saw him about 10 days later. He had made great process in the setup. His lead arm was now above his trail, his shoulders were square to the target and his balance was over the balls of his feet – MUCH better than where we started. I checked these positions and had him hit a couple of shots.

Each shot he started from a good set up. So we went on. His takeaway was slightly inside and the face of his club was slightly hooded on the backswing. I showed him the proper takeaway and where the club should be at waist high. He repeated that position (probably 200 times) during the lesson – he hit very few balls… I showed him on video, we checked, rechecked, he described the feelings.. etc… Lesson ended.

Lesson #4 – 2 weeks later – he came to the academy. I checked his backswing – was inside and hooded. Showed him the correct position. His quote was he knew where we were supposed to be… I answered “Great – show me”. He showed me correct position in a drill – then when hitting a ball – brought the club inside… I had him drill to correct position again and told him to continue to work on it… that’s it, no more… (To be honest, think he was a little frustrated, but he was starting to get the hint we were not going on until he fixed what we were working on).

Lesson #5 – Week later – he came to the academy. Perfect single axis set up – perfect back swing. Absolutely on plane to the top of his swing… but he was over swinging and his elbow was flying. You should have seen his face when he saw his perfect backswing… Now a dilemma… I knew we needed to shorten up his swing and get his elbow in a much better position (no flying out like Jack Nicklaus). I discussed with his father and we decided to wait – not because he couldn’t handle it, but he had a big tournament the next week and this change was sure to cause a lot of bad scoring (big change and dramatic different feeling in swing). So – I did the next best thing. I discussed where he needed to have his elbow at the top of his swing and why. He understood it was to make sure his elbow was in front of him at impact rather than “trapped” behind him which will happen if the elbow “flies” in the backswing. So we worked on impact with trail elbow in front of him.

Next Week – His tournament – Par 70, 30 mph wind, 36 hole Conference tournament.

He shot 70, 69 (1 under) – finished top 5 – hit 75% of the fairways and 80% of the greens (yes, he did not putt well……but we haven’t got there yet…)

Reason I tell this story….

As you see – when working with this young man, I worked on ONE THING and only ONE THING at a time. NO MORE. Not because he couldn’t handle more, but because any golfer who wants to get better has to MASTER one thing at a time, and only ONE thing at a time. If you don’t, you will get nowhere. The entire process will be confusing and misleading. If you progress in this manner – you’ll be amazed how much better you get FAST.

This young man was an interesting “case” as he didn’t know what I was going to teach next… he hadn’t studied “ahead” as many of those we work with. Not that this is bad (in fact, we think it is great to “read ahead”), but you still must work on one thing at a time. No matter how much you want to skip ahead, it doesn’t work… skipping ahead only causes confusion and problems (big problems) in the swing.

Moral of story:

  1. Get something to study to view the “perfect” model of the swing. Check your swing against this model.
  2. Get someone to look at your swing. You can video your own swing (view yourself), send it to us for comments, etc.. or see us in person.
  3. Take ONE thing at a time. No matter how good a student you are, you can only work on and master one thing at a time. Some will master faster, some slower… but if you do one thing at a time – you will master the fundamental positions.
  4. Check your swing often and know the model well enough that you know when you have “mastered” a position. You will, you’ll be surprised how fast you can do this and be even more surprised how mastering just one thing will dramatically improve your swing.
  5. Don’t put a time frame on fixing your swing. Some positions will come faster than others, but they will come with time.
  6. GET OUT OF YOUR OWN WAY – as Moe always said…..

Good Luck – Remember – Always practice with a purpose (one thing at a time).

LEARN

THE

SWING

Join 1M+ Subscribers to get your FREE Video Quick Start Guide that reveals how to hit the ball farther and straighter more consistently from now on…

START YOUR NEW GOLF SWING