Fundamental, Why, Practice and Check Points

Fundamental, Why, Practice and Check Points

The first morning of our schools and camps I (Tim) talk to the students about what they are about to go through. One of the topics is the process of learning and how to get the most out of the school. This process is the same we all need to go through to create new habits – I wanted to discuss a little in this e-tip. Here is what all need to do to create new habits:

1.  Learn the Fundamental

You must first learn the fundamental(s) that you need to work on. Whether a long game, short game, mid game, etc… fundamental such as the grip, set up, etc…  you need to study the fundamental you want to work on. Learning doesn’t mean doing at first, it means understanding what is correct and what is not.

2.  Learn the Why

As you are working on creating a new habit, you need to know the why of the fundamental. More than, because we said so, but rather, why the fundamental is important. As you are making the change(s), you will feel uncomfortable at first. If you don’t know the specifics of why you need to make the change, your brain will “give up” when it becomes uncomfortable. (Very common). If you know why – you will be more likely to get through the uncomfortable stage. This is the conscious thought eventually transforming to the unconscious thought. It takes time, but your conscious thought must know the “whys” at first to continue with the change.

3.  Learn How to Practice to Create the New Habit

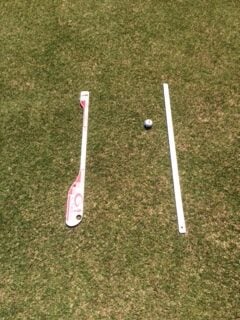
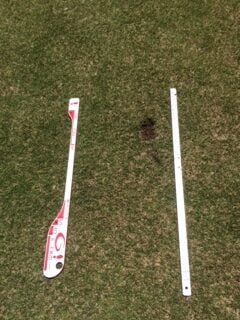
You can know what fundamental you need to work on, you can know the whys… but if you don’t know how to practice toward creating the new habit, your improvement will be limited, or at least slowed considerably. Whether performing drills, using training aids, or both, it is absolutely critical you learn how to practice toward creating the new habit.

4.  Check Points

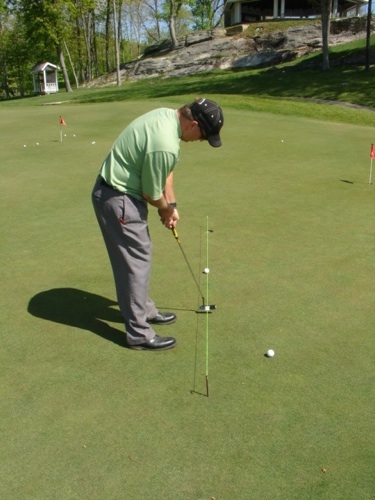
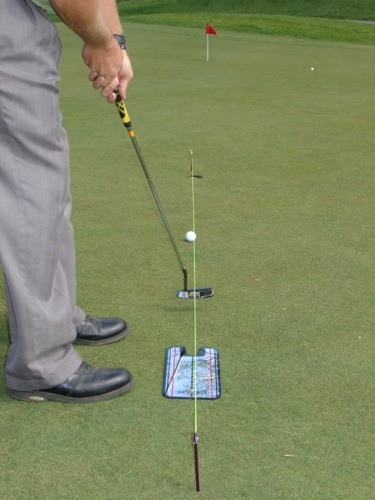
During your practice, you must have check points. The check points are set up so you can make sure you are creating the fundamentals correct. The more check points you have, the better. Check many, check often, don’t forget to check. As many already realize, it is much easier to make yourself worse than better – you can prevent this by having check points and checking often while practicing and working toward the new habits.

Some of us can self-teach, some of us have a hard time with this…. it is really and individual thing.

Most of you know we have many instructional DVDs you can review on fundamentals, drills, etc… If you have not seen them, you can review them at moenormangolf.com

We also have a coaching program you might not know about. It is a great way to get individualized work with a GGA Master Instructor – we will let you know exactly what you need to work on. Give you the whys, drills and check points to guarantee improvement. You can try for a month, or as long as you want…

Pre-Shot Routine

This time of year, I assume most of you are getting on the golf course – maybe practicing a little less and playing a little more? Or maybe both, practicing and playing?

As you start to get on the course more, worrying about the swing less and more about course management, I wanted to talk a little about your pre-shot routine.

What type of pre-shot routine do you have? How would you rate your pre-shot routine? Is consistent (do you do it every time)?

A pre-shot routine is something you do prior to hitting the golf ball that does the following:

1.  Gets you ready for the shot.

2.  Gets you set up in the best possible situation to hit your best golf shot possible.

3.  Gets you in a positive frame of mind.

4.  Gets you comfortable.

Everyone has a different pre-shot routine. A pre-shot routine is unique to each individual. It can be long, can be short, and everything in between.

Examples – One’s everyone have seen:

1.  Keegan Bradley – looks like he is starting, stopping, starting, stopping…..

2.  Sergio Garcia – everyone remembers a couple of years ago when he looked and looked and looked at the hole (one time I counted 17 times…)

3.  Jason Dufner – Waggles two or three times, waggles the club parallel to the ground, sets up again and swings.

4.  Moe Norman – look at the hole, square the club face, look back at hole, square the feet/body, set club back and swing (very fast).

I am not promoting any of these in particular, just wanted to show how everyone is different and has a different pre-shot routine that is unique to them.

When coming up with your own pre-shot routine, there are 3 things you need the routine to involve:

1.   Alignment to target (make sure the club face is square to the target). And body alignment to target.

2.  Ball position – make sure proper ball position.

3.  Tempo – a good / “calm” / rhythmic pace that works for you.

Again – there are only three things you can “control” when setting up for the golf shot – (I call them the ABT – Alignment, Ball position and Tempo).

Everything else is considered part of your fundamentals and should NOT be worked on while playing golf (i.e. grip, set up, etc. etc..). These should be worked on when practicing NOT playing.

I will give you my example – my pre-shot routine (again – not for you to necessarily copy – just an example).

When I approach a golf shot I first do my “calculations and assessment” of the shot. I determine the yardage, the wind and direction, I look at the lie of the golf ball, I look at the pin position, etc. etc… All these allow me to decide what club I will hit and how I want to hit it (low, high, cut, draw, straight, etc..). (This is NOT part of the pre-shot routine – this is prior to the pre-shot routine).

After I have determined what shot I want to hit and selected the club, when it is my turn to hit, now the pre-shot routine is about to start.

So my turn to hit…

1.  I stand behind the ball in line with the target – facing the target. I take a practice swing trying to feel and visualize the shot I am about to hit (as Jack Nicklaus said – “I hit every shot twice in my mind before I actually hit the shot”).

2.  Next – I lift my club parallel to the ground pointed at the target (still while behind the ball) – this is my “go” trigger.

3.  I walk up next to the golf ball and place my club’s leading edge directly behind the ball and square to the target. I have NOT squared my feet yet.

4.  Next, I square my feet with proper ball position to the leading edge of the club (feet perpendicular to the leading edge of the club) and then look up to check and make sure I am lined up properly at the target.

5.  I look down, set the club back body center for a split second, then start the swing.

As you see, the work is done prior to getting over the ball. Once approaching the golf ball, alignment, ball position and tempo are involved in the pre-shot routine, nothing else. This allows me to be comfortable and confident over the shot.

If during the pre-shot routine, something seems off or “gets in my way” – I back off and do it again.

Timing – 95% of good players, including PGA professionals, will start their swing, aka “pull the trigger” within 4 and 7 seconds after then set the club down behind the golf ball.

If you look at my scenario above – from the first time I set the club face down square to the target, I swing the club in 5 seconds.

When playing with Moe – he started the swing 4 seconds after placing the club on the ground. But Moe always had a “fast” tempo.

For many, this might seem rushed – but if you are confident in your swing, confident in the shot, and have done the pre-work prior to setting up over the golf shot – it is perfect time to keep the body in good flow and rhythm.

In conclusion – do not try and copy a pre-shot routine. Come up with one that is unique to you.  I would recommend watching other good player’s pre-shot routines – maybe using parts you like…

Create one that works for you, is comfortable for you and puts you in the best possible set up to hit the golf shot with the most confidence.

Using Your ABT and a Yardstick

Was putting in a little practice time today (before watching the last round of the U.S. Open (btw – congrats – Brooks Koepka)) and had a golfer next to me on the range ask me about my practice station (yardstick and ABT..).  Thought it might be a good time to rerun the set up and ball position article using the ABT and yardstick.

Many times, after our school day ends, myself (Tim) and a few of my assistants (typically Chandler..) will practice a little before we call it a day.  After our school this past weekend, Chandler and myself stepped outside our academy and  hit a few balls.  During our practice session, I set up my normal practice “station”.  A couple of our students stayed after the school and were watching us.  After a few minutes, one of them commented how much I used the yardstick (with my Alignment and Ball Position Trainer (ABT)) while practicing….. it seemed unusual to me that he didn’t know how important the combination (yardstick and ABT) were – so I thought I’d write this practice tip on using the ABT with a Yardstick.

Here are 6 ways to I use the ABT and Yardstick:

getPart

1.  Checking iron ball position and distance to the golf ball. If you are going to hit the ball from this position make sure the ball is at least 3 inches away from the edge of the yardstick.

4969055ec06d1_ABT10

** Distances form Toe (foot) Line to the Golf Ball (inches) **

getPart-2

2.  Checking driver ball position (DBP) and distance to the golf ball.

getPart-3

3.  Laying Yardstick next to ABT to help square face of golf club.  When setting up, make sure grooves on clubs are lined up with the markings on the yardstick.  It is also and easy way to slide the ABT up and down the yardstick so you can make many divots at the IBP position and keep the ABT square to the target.

getPart-4

4.  Setting Yardstick at angle at back end of ABT to check the club angle at position #3 in the downswing.  (Review to PVC / Single Plane Position Trainger drill).

getPart-5

5.  Setting Yardstick parallel to the ABT forming “railroad” tracks.  Will help square the face of the club at set up and help as additional reference when setting up.

getPart-6

6.  Divot check.  When practicing with the “railroad” tracks – make sure divots are aligned with the yardstick.

Obviously, you are not going to use these set ups “all at once”.  I routinely adjust and change the placement of my yardstick checking different positions / areas of my swing.  Divot angle, club face alignment, etc..

I can guarantee you, if you ever see me in person with my golf bag, you will find my ABT and yardstick tucked inside.

Again – a few easy ways to maximize your practice.

To review ABT training:  CLICK HERE

Talent – Nature or Nurture?

At age 41, I grew up in the culture that talented individuals were born with special gifts, talents if you will, that the rest of us did not possess. We’ve all known people like this, people who seem to be “gifted” and can adapt to learning new skills seemingly with ease.

These folks are celebrated in our culture, movies are made about them, they are featured on TV, showcasing their God given talents. We admire them, put them on a pedestal, even worship them. And in most cases, envy them, as we just feel like we were dealt a different hand in life.

Over my career with GGA, I think a lot of you reading this article are of the same mindset that I describe above.

Now, being the eternally inquisitive person that I am, along with another seeker like Todd, it’s come to light that talent may not just be a God-given gift after all. Research has emerged, and been brought to the public that talent, in fact, is earned through our repetitive actions. I have seen this firsthand, countless times in our golf school programs, and I have experienced this personally as well.

While the supporting research is there, my practical experience in regards to learning the golf swing, is that our bodies will do whatever our brains tell it to do. Now that comment may have thrown you a bit.

Our bodies will do whatever our brain tells it to do.

For years we’ve heard about muscle memory, which is not the case, but rather our muscles are doing what our brains are telling them to do. You see, when we repeat a physical action regularly, over time, our brains ‘hard wire’ that movement into a subconscious process. This repetition, over time, produces neural connections in our brains, and those connections are insulated with a substance known as myelin. Think of myelin like an insulator on an electrical wire. An insulated electrical wire will carry the current much more efficiently than an uninsulated wire.

This is why we can brush our teeth, drive a car, tie a neck tie, tie our shoes, or sign our signature without conscious thought. And we can do those thinks quickly.  Why?  Because the neural connections in our brains controlling our muscle performing those tasks are highly insulated with myelin.

GGA schools are all about helping you build myelin.

Our school programs are centered around the firm belief that you can master the swing through practicing correctly over time. What we strive to help each student experience in the school programs is the feeling of the ideal mechanics. And then to repeat that feeling, under the watchful eye of an instructor. We know without a doubt that this process is a 100% effective way for you to improve your swing, and your game.

So, you see, our school programs are the place for you to not only build new feelings, but practice them. Our goal is for you to leave your experience with the correct fundamental feelings of your perfect golf swing, and armed with the tools you need to put in the time and repetition needed to perfect them.

In closing, we think of our schools more as “talent development” programs, than golf schools. Are you ready to develop your talent? If so, we look forward to seeing you soon and helping you in person earn your talent!

You can see our upcoming “Talent Development” programs on our school calendar page

The 3 Ps of Putting Revisited

After last weeks Practice Tip Article “Putt Your Way to A Great Golf Swing” – I received many emails and calls about our recommended Putting Fundamentals, Practice Set Up, Putting System, etc… So, thought it would help many to republish an e-tip article published a few years ago:

THE 3 Ps OF PUTTING

Simply stated, it is “Practicing your Putting with a Purpose”

Folks, it is actually pretty simple and painless, you just have to DO IT RIGHT!!!

Now, before you think to yourself, “Yeah, I know, Tim always says how important putting is, but I really need to work on my full swing first”, please read the following stats and “studies” that have been conducted and then I will explain how you can literally improve your game overnight…

First – You must first realize the importance of putting. 43% of scoring occurs on the putting green for the average player (male shooting 97, female shooting 107). As the scoring increases, so does the % of putts. For a scratch golfer, the percentage lowers to about 40%, but no lower.

The statistics are as follows:

  • 30 handicap golfer (aver 100) – 45 putts per round
  • 20 handicap golfer (aver 90) – 40 putts per round
  • 10 handicap golfer (aver 80) – 35 putts per round
  • Scratch golfer (aver 70) – 30 putts per round
  • Professional golfer – 28 putts per round

Second – You would think “that only makes sense” as the 30 handicap golfer will hit it further from the hole than the 20 handicap golfer, thus have more putts…. but you would be wrong. If you think of the way golf is played and the way putting stats are kept (just add up how many putts you have once the ball is on the green) – the 20 handicap golfer actually will hit more greens in regulation than the 30 handicap golfer (he/she will be chipping from the side of the green, etc..). Meaning, if you take the average distance to the hole once the player hits the green, typically the 20 handicap golfer will be further than the 30 handicap golfer… in theory if both had equivalent mid/short games – but here lies the problem.

Third – There are only 3 areas that matter in putting (or any part of the golf swing) – Path, Face Angle, and Speed. Putting is affected by these 3 areas and only these 3 areas. Meaning, everything you work on in putting (for example the grip, set up, etc..) affects either path, face angle and/or speed. The better your path, the better your putting, the better your face angle at impact, the better your putting, the better your speed, the better your putting.

Fourth – READ THIS VERY CAREFULLY: Studies have shown that of 10 golfers who practice their putting, 5 will get no better, 4 will actually get worse, ONLY 1 will improve after practice. Please read this again – of those who practice their putting, 10% will improve after the practice, 50% will not, and 40% will ACTUALLY MAKE THEMSELVES WORSE. (This study was performed numerous times testing golfer’s putting prior to their practice session and after.) As is said in Peoplewise Putting, “Golfers can add, subtract, multiply and divide, and they DON’T like these odds.” I don’t know about you, but if I have a 90% chance of not improving when I practice, “I ain’t practicing” (as they say in Oklahoma…)

Okay – now that everyone is on a “downer” about their putting practice, we’re here to fix that.

Over the years of playing with some of the best players in the world (including Moe, Tiger and many others), competing against many of these players, studying numerous techniques of the short game, etc… etc. the Graves Golf Academy (myself in particular) created/perfected a method to improve your putting. Are these “our techniques” – I would have to say no they are techniques we have brought to you from what we have learned from the best in the world – but we have set a system to help you GUARANTEED – if you follow the GGA system.

Many have/had asked me how I practice my putting – I have used this system since the early 90s when I started competing on mini tours and other professional PGA/Nationwide Events as I saw so many other professionals using the same method.

GGA SYSTEM – How to Practice Your Putting with a Purpose EVERYTIME you practice. (In other words, every time you practice, you will one of the 10% who improves!!)

You can see the system (pictures and description) on our website at Online Instruction, Putting System.

It is and EXTREMELY EFFECTIVE AND EFFICIENT system is you use it correctly. Meaning with minimal practice you can become a MUCH better putter and improve your handicap DRAMATICALLY! This system creates a Check System for you every time you practice and gives you a system that you can take to the golf course.

Please refer to the pictures on Putting System:

Pic. #1 – Recommended for the system. Stakes/string, Eyeline and a “Line ‘Em Up” Marking Tool

Pic. #2 – Set the string in the green from the hole backwards. Set straight to the middle of the hole if a straight putt, if there is break, set accordingly (for example, one cup break, set one cup to the appropriate side of the hole). If you have difficultly reading break, the string HELPS YOU see the break.

Pic #3 – Place a ball under the string (middle of ball under the string). Square your putter face to the string and putt. You will IMMEDIATELY see if your putter face is square to the string/target or not. If not, ADJUST immediately. NEVER putt with a putter face that is not set square to the target.

Pic #4 – The ball should start down the middle of the string and remain down the string for a length of time (depending on severity of break). No break – “ride” the string into the middle of the hole. Minimal break – “ride” the string for a long time until breaks off close to the hole, a lot of break, “rides” string for a few feet and then breaks off toward the hole. This is how you can compare the break to what you read and more importantly determine if you are STARTING your ball on the line your intended. Most average golfers DO NOT!!! In other words, most golfers will set up to a ball, putter face will be either open or closed and then they will either pull or push off their line…. good luck putting consistently……. and to top that off, this type of putting will create side spin on the putt – NOT GOOD!! You want OVERSPIN only on the ball – NO side spin. Putting down the string will help you 1. Square your putter face, 2. Hit the line your intended, 3. Minimize side spin on the ball – ultimately creating CONSISTENCY!!

Pic #5 – Place the “Eye Line” under the string. Line up the black line in the middle of the Eye Line with the string.

Pic #6 – As you see the “Eye Line” is a VERY EFFECTIVE tool and one I added this year. Reasons – 1. It enhances the view of a square putter face at set up but numerous lines on the Eye Line. 2. It enhances the view of the center of the putter (sweet spot) when setting up over the ball. 3. It shows you if you are making a good path or not with the putter but the lines on the EYE LINE.

Pic. #7 – The putter should NEVER go outside the upper read line and should track down the center black line or inside. It should NEVER go outside. This is VERY EASY to see with the EYE LINE. MOST IMPORTANT and why I now recommend the EYE LINE. As you look down, you should see your eyes over the black line. Your black line will line up with the middle of your eyes – hence the “EYE LINE”. Folks – this is the one area I see SO MANY golfers including our alumni break down on…. They do not get their eyes over the putt line which causes 2 LARGE problems – 1. Your putter will only be square for long – meaning, there is only a minimal range of the putter face being square at through impact – the putter will arc too fast if your eyes are not over the ball, 2. You will not be reading the same line when you set up over the ball as you read behind the ball. You will be “seeing” the line inside the ball – NOT the one you are putting on – or the only one that matters. YOU MUST HAVE YOUR EYES OVER THE BALL / BALL LINE to be a consistent putter – whether using a short, belly, long or side saddle putter.

Pic. #8 – Once your eyes are over the ball and your putter face is square, putt down the line.

Pic. #9 – Remove the string, perform the same drill (Eyes over ball, face square, etc..) – this time check to make sure your HEAD (on your body) remains still. You will see it move (even if minimal) when using the Eye Line – your eyes/head should stay still. If not, your putting will be extremely inconsistent. KEEP YOUR HEAD STILL for consistent putting – Eye Line will show if you do or not.

NOW, HOW DO WE TAKE THIS PRACTICE TO THE GOLF COURSE??

Pic #10 – Take the “Line ‘Em Up” Putting Tool (comes with a Sharpie) and draw a T on your golf ball(s). (Reason for drawing tool… if you can’t draw a square T, don’t draw one at all…)

Pic #11 – You will now have a straight T on your golf ball. (It is a legal mark that can be used during all play – many professionals use this mark.)

Pic #12 – Place the ball on the green, with the T pointed to your target (as you did with the string). Square your face to the T. In other words, the top of the T will square the blade of your putter to the target, the line on the T (lower part) will act as your string – show you the path and target line.

Putt the ball toward the hole – (Eyes over the ball, etc.) If putted with a good stroke, you will see the T rolling end over end.

The T will actually roll end over end into the hole (when hit with a square putter face on the correct line with good path). All these are created with the string and Eye Line and taken to the golf course with the use of the T.

Here’s the deal….

  • If you only use part of this system – DON’T USE AT ALL!!!
  • The T will not be effective if you don’t work with the string.
  • The string will not be effective if you don’t have a good path (eyes over the ball, etc.)
  • The Eye Line will not be effective to help you take your improved putting to the course unless you use the T.

This is a SYSTEM that works – I GUARANTEE IT!!! This is how you (and most professionals) improve your putting. The system is not hard – in fact, it is very simple and doesn’t take that much time. Every minute you practice using this system will improve your putting… which in turn will improve your scoring and decrease your handicap – SIGNIFICANTLY!!

I have worked with the string/T myself and with my schools for years and seen DRAMATIC improvement. But, it always bothered me that the issue of the putter face remaining square through impact and the golfer seeing his/her line when they got over the ball was still a problem. That is why we introduced a very simple but VERY effective tool – the EYE LINE.

Everyone – no matter where you game is now – you need to improve your putting. You need to create more consistency in your putting. It is absolutely the faster way to lowering your scoring.

Remember the 3 Ps of Putting – Always Practice Your Putting with a Purpose

Putt Your Way To a Great Swing

Hope many of you got to see my webinar last Wednesday – April 15th.

During that webinar I discussed how working on your short game (putting, chipping and pitching), if done properly, can and will dramatically improve your long game.

Had GREAT response during and after the webinar. To be honest, didn’t surprise me as it is the same response I get when I present this same topic during our schools and camps.

What does surprise me is how many don’t understand this concept – working on proper short game fundamentals will improve your long game.

So – thought would talk about the first (putting) and how working on putting can help your long game.

Fundamental #1 – Hands Leading

In every shot in golf – your hands should lead at impact. In other words, your hands will be ahead of the golf ball at impact including putting. Then why do most average golfers set up with their hands behind the ball when putting?

When you set up over a putt, your hands must be ahead of the golf ball. The butt end of your putter grip should be forward of your belly button – in fact, for most, half way (or more) between your belly button and your lead hip.

If your hands do not lead when you putt, it is guaranteed your hands will not be leading in your full swings. If your hands are not leading, you are training your body to make impact with the golf ball with the hands behind the ball. (Aka casting in the full swing).

Fundamental #2 – Face Square at set up and Impact

How are you checking to make sure your club face (putter face) is square at set up and impact?

It is strongly recommended you use a check system to make sure your putter is square at set up and impact (square to where you are trying to hit the ball).

putting_systempic7

It is surprising how many golfers do not have a square face and compensate during the stroke.

The picture above shows using the GGA putting system – string and mirror checking the putter face angle.

And – can almost guarantee – problem squaring your putter face, same problem squaring any club face…

Fundamental # 3 – Hands Down the Line

How do you check to make sure your hands go “down the line” past impact?

Your hands should go down the line and toward the intended target through impact.

Most golfers struggle with this fundamental. Their hands go in and up through and past impact. Your hands should go down the line through impact. As you see in the picture below the putter face is still square past impact and down the line. This check will make sure your hands are going “down the line” toward your target.

putting_systempic5

Here is another picture of the putter face down the line:

putting_systempic9

In the full swing, your hands must go down the line through impact. You can have an on plane golf swing – but if your hands do not go down the line, it will cause impact with a club face coming to impact at an angle (out to in, etc..). This is a start to working on getting your club face and hands down the line.

These are 3 putting fundamentals you can check that, if done correct, will not only greatly improve your putting, but will also help your full swing.

LEARN

THE

SWING

Join 1M+ Subscribers to get your FREE Video Quick Start Guide that reveals how to hit the ball farther and straighter more consistently from now on…

START YOUR NEW GOLF SWING